Have you always wanted to paint icons, but didn't know where to start? I bring to your attention a detailed master class on making the icon of St. Irene. The art of icon painting is a very exciting and unusual form of creativity. Please your loved ones with a handmade icon, into which you put not only effort, talent, but also a piece of your soul.
We will need:
- board, size 20×15, but you can use any; - skin; — white acrylic paint for primer; - gouache; - PVA glue; - glue moment; - wood varnish, preferably matte, so that the icon does not glare; - rhinestones; — a sample icon (Orthodox calendars, icons, electronic versions of icons are suitable).
Step 1. Carefully sand the board.
Step 2. Prime the surface of the board. To do this, stir the paint well, you can add a little water. Next, apply white acrylic paint in 2-3 layers. Sand with sandpaper. Wipe off the dust with a damp cloth.
Step 3. If your icon sample was taken from the Internet, it is better to print the version according to the size of the board; it will be much easier to draw. Now we draw over the icons with a pencil. To make the work easier, you can use tracing paper: first transfer the drawing onto it, and then onto the board.
Step 5. Take ocher paint, dilute it with water and paint the board. In this case, the outline of the drawing is visible to us. Don't forget to add glue to the paint.
Step 6. When the surface of the icon is dry, we begin to fill the outline with color. For example, let's start with the face (face). We take the darkest paint, because... Later we will highlight the face. We do the same with other fragments. We paint it in a dark tone, and at the next stage we lighten it. For example, the Saint’s robe is green, fill the outline with the darkest shade of green that we see on the icon. When filling out the fragment, we remember that there are no bright, open colors in icon painting. They are all muted. For example, red color can be mixed with ocher and brown.
Step. 7. We have come to the most important stage of icon painting - the elaboration of fragments. It's better to start with the face. We need to give shape to each fragment, breathe life into it. At the moment, the face of the Saint is dark. We need to brighten it up. We take ocher paint, you can add white, and apply it to the area of the cheekbones, forehead, and chin. We achieve a smooth transition. We may have to work hard, apply 3-5 layers of paint. The face, like the rest of the fragments, must be flawless. We carefully draw all parts of the icon.
Step. 8. When the icon is completely ready, it is necessary to coat it with varnish. You can use spray varnish. Apply the varnish evenly in 2-3 layers.
Step. 9. At the final stage, we will glue the rhinestones with glue. To do this, you need to mark the places for the rhinestones, then carefully glue them onto the icon.
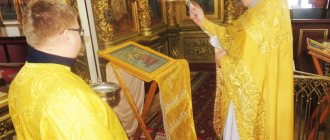
Our work is completed, all that remains is to take the icon to the temple and consecrate it. Creative success and God's help.
The description was prepared by Maria Kruglova.
Art materials from the CretacoloR
from the Austrian company “Brevillier Urban & Sachs”. Pencils, pastels, sets for artists.
Gilding
Transfer potal.
Catalog in the store: paints, pastes, kits for gilding and silvering and decorating various surfaces.
Pearlescent pigment - gold.
Iconography
Iconography and other artistic directions.
Materials used in icon painting can be of plant (board), mineral (paint pigments) and animal (tempera egg base, fish or flesh glue) origin.
Tradition dates the creation of the first icons to apostolic times and is associated with the name of the Evangelist Luke. The oldest icons that have come down to us date back to the 6th century and were made using the encaustic technique on a wooden base, which makes them similar to Egyptian-Hellenistic art (the so-called Fayum portraits).
High quality icon printing for individuals and organizations
Today, icons on canvas are created both by professional icon painters and using modern printing equipment.
Using large-format plotters designed for high-quality art printing, we can produce an excellent copy of any image, which will be distinguished by the depth of color and clear detail of the picture. After printing, the canvas is treated with varnish, which makes the final image durable and protected from UV radiation.
Comments: 3, Catalog: 6
Correction of inventory and painting, fields, etc.
At the end of the painting of the icon, all the lines of the inventory and painting of the icon are corrected or duplicated and all the necessary corrections are made.
The fields are usually painted over with the same paint as the light (background), or with a different one, according to the master’s taste. Sometimes images of saints, lives (stamps), patterns, inscriptions and even entire troparia are written in the margins.
At the edge of the husk or the border of the colorful surface of the icon, a line called a “layering” is made in a neutral or white color. On the outer edge of the fields, a border or “edge” is drawn with dark paint - cinnabar or red ocher.
Sankirenie. Confidentiality and processing of personal
It is impossible not to pay attention to the amazing thoughtfulness, expediency and consistency of the techniques for painting the icon. Indeed, everything here is provided for and prepared so that, having completed the secondary preparatory work, we move on to the main thing, to the “personal”.
Starting with the pre-personal, the master icon painter immediately solves the problem of coloring, giving all parts of the icon movement and taking care of the balance of colorful relationships. Having processed all the surfaces of the pre-personal, he, as it were, finds and predetermines the flavor of the personal.
Line cutting of prelich
In the expression of the form of volume, that is, pre-personal highlighting, there was and still is a highlighting with created gold “with a lance”, or “with an assist”.
On the prepared surface of clothing or other parts of the interior, the icon painter applies pen strokes to the places of light with created gold diluted with water. This name probably came about because the golden strokes, placed broadly and richly in the light, were applied in the shadows with thinner and weaker strokes and thus resembled a bird’s feather.
This highlighting technique is a very painstaking work that requires good vision and skill. To be convinced of this, you need to carefully look at samples of ancient icons with gold trimmings.
Processing of prelic
After opening the icon, everything personal is processed. First, all the external outlines of the colorful areas are outlined - this will be an “inventory of the pre-personal”, and then all the lines (gwents) of the internal drawing of these areas are written - this will be the “painting of the pre-personal”.
All lines of inventory and painting were applied with a thin brush in the color of each area, but in a darker tone. And sometimes they were written on the entire icon in one color, called “exedra” (a mixture of black and red), and sometimes just black paint.
Inventory and painting have the meaning of a graphic expression of volume in an icon. In identifying the latter, ancient icon painting always strived for a special understanding of volume, different from its understanding in paintings.
Personal letter
palette composition: light and red ocher, titanium and zinc white, cadmium red (I don’t use cinnabar), chromium oxide, green earth Italian, burnt umber Italian, Kassel brown Italian, grape black Italian;
sankir: light ocher + red ocher + chromium oxide (or green earth if miniature);
I place the sankir very tightly and evenly so that the gesso does not show through, then I write only with pure pigments;
I restore the inventory with black (brown) pigment;
I apply thick titanium white to the engines;
I do highlighting with melts of zinc white, blush, shadow splashes;
I fuse everything with red ocher at the beginning of the work, at the end of the work with light ocher, if the face turns out to be slightly yellowish, at the end I fuse it with red ocher;
Complete collection and description: prayer hand drawing in pencil for the spiritual life of a believer.
Icons are painted images of various saints. Icons decorate all churches and temples. Parishioners pray to the saints on the icons, asking for their immediate needs. They teach how to draw icons correctly in special art schools. You can try to learn how to draw an icon of the Virgin Mary with the Child Jesus Christ, which is what we will do in this lesson.
Stage 1. Draw an oval on the entire sheet of paper. In it we begin to draw the outlines of the figure of the Virgin Mary: we show the line of the shoulder, neck, head and face.
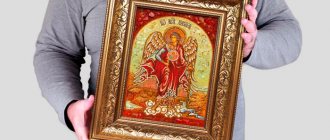
DIY icon
I bring to your attention a master class on icon painting “Vladimir Icon of the Mother of God”. The master class is suitable for beginners and professionals. For icon painting, it is better to choose natural, slightly muted colors.
To work you need to purchase:
- board size 25*18;
- gouache paints;
- PVA glue;
- natural brushes of different sizes;
- matte wood varnish;
- sandpaper;
- white acrylic paint;
- glue for tips;
- rhinestones, pearls.
1. Sand the surface of the board with sandpaper.
2. Cover the surface of the board with white acrylic paint in two layers. Go over the board with sandpaper. 3. Wipe the board with a damp cloth.
4. Draw the icon with a simple pencil. You can draw from illustrations and icons.
5. Cover the surface of the board with ocher paint.
6. Outline the drawing with brown paint.
7. Fill the icon with color in two layers. Add PVA glue to the paint.
8. Start drawing with the face. Use a lighter shade of paint to highlight the area of the forehead, cheeks, and nose.
9. Draw the details of the clothing, folds, legs, arms. Don't forget to add glue to the paint. Pay special attention to your eyes. To draw them, a very thin brush is useful.
10. Write inscriptions on the icon.
11. Glue pearls and rhinestones around the halo. Glue for tips is ideal. You need to take rhinestones with a toothpick dipped in water. 12. Cover the work with matte wood varnish.
13. Bless the icon in the temple.
The icon is ready. Now you have a great gift for friends and family. Creative success and inspiration!
The author of the master class is Maria Kruglova.
Did you like the product and want to order the same from the author? Write to us.
In order not to forget the page address and share with friends, add to your social networks:
How to draw an Icon with a pencil step by step
Icons are painted images of various saints. Icons decorate all churches and temples. Parishioners pray to the saints on the icons, asking for their immediate needs. They teach how to draw icons correctly in special art schools. You can try to learn how to draw an icon of the Virgin Mary with the Child Jesus Christ, which is what we will do in this lesson.
Stage 1. Draw an oval on the entire sheet of paper. In it we begin to draw the outlines of the figure of the Virgin Mary: we show the line of the shoulder, neck, head and face.
Stage 2. Then, near the head of the Virgin Mary, we outline the contours of the head of the baby Jesus, his body, arms and legs. Stage 3. Draw the details of the face. Beautiful nose, clear eyebrows, eyes, mouth. Around the head we complement the lines of the bedspread; it falls from the head to the neck and then to the shoulders. We draw these lines very smooth and gentle. We also show the baby a neat nose and mouth. Stage 4. Now a very important stage in drawing the icon. This is the drawing of the eyes. The eyes of saints are given special attention. They are always drawn as very expressive, looking at the person standing in front of them from whatever side you look at. We draw the eyes of the Virgin Mary very beautiful, almond-shaped with clear pupils. Jesus also has rather large eyes with an expression that is not childishly serious. The eyebrows are slightly shifted towards the bridge of the nose. Stage 5. Decorate the veil of the Virgin Mary. We draw beautiful patterns in the stripe above the forehead. We will also add patterns to the neckline and slightly behind the neck. Draw wavy lines along the baby's hair. Stage 6. We draw a circle around the head of the Virgin Mary - a designation of her belonging to the ranks of saints. The baby Jesus also has a circle around his head in which cross-shaped lines intersect. Let's finish drawing his handle, peeking through the slit of his clothes. On the legs we will add a few strokes to imitate streaks of blood. Stage 7. On the baby’s robe we will show several smooth lines of folds and draw the second handle. Here we show the right hand of the Virgin Mary. Stage 8. Add lines to the clothes of the saints. Stage 9. The black and white version of the icon looked like this: Stage 10. The icon can be colored the way we did it. Try it and you will end up with a hand-drawn icon.
Draw the Virgin Mary
Good afternoon, Today we will draw the Virgin Mary (step by step). Virgin Mary, one of the most revered personalities and the greatest of Christian saints. Virgin Mary earthly mother of Jesus Christ. We are often asked to teach how to Draw the Virgin Mary. Let's get started:
Draw the Virgin Mary
Step 1 First, let's draw a circle - this will be Mary's head. Then we will draw lines as shown in the figure.
Drawing the basis of our drawing
Step 2 Using the resulting shape, draw Maria’s profile, framing it with curly hair along the right side of her face.
Drawing a face
Step 3 Using the lines we drew in the first step, draw the outlines of the eyes, eyebrows, a simple shape of the nose and move on.
Drawing the outlines of the eyes
Step 4 Draw the nose, and then draw the lips and eyelid lines.
Drawing a face
Step 5 Now that we've drawn Maria's face, we can start painting her hood. We make simple lines, as indicated in the picture Draw the Virgin Mary, not forgetting about the hairstyle, the hair of the Virgin Mary is visible from under the hood, it is evenly laid and has a dark color.
Drawing the Hood
Step 6 Draw the neck line, collar and complete the shroud. We make folds on the hood. Erase unnecessary lines.
Finishing the shroud
Step 7 This is what our Virgin Mary looks like. You can add shadows to make your How to Draw the Virgin Mary look realistic, but it will take more time. And you can color the drawing, you can do this as in our lesson, or you can come up with new colors yourself. Create, create, act. Good luck!
Erase extra lines
narisuy-ka.ru
LiveInternetLiveInternet
Quote from the message Rozhdena_Vesnoy DRAW ICONS FOR PAINTING.
About how to use icon drawing. The word “template” does not apply to icons. I hope it will help and inspire many to create family heirlooms that will be passed down from generation to generation. Just in case, I would like to emphasize that if you want to create a “strong” icon, you need to: fast, confess, read a special prayer, take a blessing from the Father before starting work.
Our Lady of Arapet (Arabia)
Catalog of the collection of icon drawings https://nesusvet.narod.ru/ico/icons/cat_pr.htm
https://www.izograf.com.ua/prorisi2.html The icon painter does not have the right to paint icons according to his own understanding...... only saints painted like that.. Based on the existing drawings, he creates a copy of the image that was before... The work of an icon painter - removing the traces https://www.icon-art.info/book_contents.php?book_id=25& ;chap=15
Eagle Taurus and Leo in Christian iconography.
Shine the icon of the Mother of God
Vladimirskaya. with the image... THE LEAP OF A BABY. Icon of the Mother of God of Korsun. SAINT NICHOLAS I bring to your attention the color drawings of the nun Juliana in good resolution (high resolution). Draw from the original icon painting of the Kiev Pechersk Lavra.
An icon is not a painting, but an image of the presence of the heavenly world
Iconography is a field that not everyone correctly imagines. If there is a certain talented artist who is able to express himself in outstanding and picturesque paintings, but painting icons can greatly disappoint him.
And there are several reasons for this:
An icon is not a painting. The image is painted using certain techniques, which come down to a certain group of techniques. You can’t transfer your style here. In icon painting there is no place for expressive creators splashing paint on the walls. Various clever techniques for using a brush and palette knife are also not appropriate here.
In some ways it is fair to call the process of painting an icon a craft. This is the same type of work using a pre-prescribed technique. Of course, it happens that artists are entrusted with entire churches to be painted in their own style, but not everyone is so lucky.
The icon is painted according to the canons. Taking and painting some interesting icon is a good initiative, but it is in little demand anywhere
Most churches and monasteries are interested in receiving, if you like, “conveyor belt” work from artists.
There is the Kazan image of the Mother of God, there is the Three-Handed Lady, etc. These are the images that you will have to endlessly draw. Some new trends are not in demand. And writing the same thing day after day, adhering to the strict framework of the canons, is a test for many artists.
It does not need to be reliably depicted, say, St. Luke (Voino-Yasenetsky). We have photographs of him, but is it the same person depicted in the icon?
No. The face lacks photographic quality, and the clothes are not typical of our era. Everything is simplified, reduced to symbolism. The icon painter does not depict a portrait of a person, but reproduces a convention, a model. The images also look flat.
The icon of St. Luke is made in the canonical style. Although we have photographs of the saint, the image still tends not towards realism, but towards simplification. Photo: hram-olgi.ru
The author of numerous works on icon painting, Ekaterina Dmitrievna Sheko, talks about it this way:
“Be that as it may, it is clear to the naked eye that the iconographic image, in comparison with academic drawing, lacks volume. It turns out this is done on purpose.
The fact is that in academic drawing, volume is created by an external light source: they turn on the light bulb, it creates shadows and thus the form is revealed. There are no shadows, light or dark corners, or light source on the icon—the entire image must be luminous.
The shape is revealed not by light, but by contour, but it does not give the depth that is present in academic drawing. There is still a certain volume - the same volume that is created with the help of tone and strokes, but still, compared to the portrait we are used to, the image turns out to be more conventional.”
And the reason here is that the purpose of the icon is to depict ideas about the spiritual world.
How many artists would want to give up what attracts them to art? From creativity, style, persuasiveness? No. Therefore, the desire to paint icons passes very quickly among those who take it up.
However, there is an academic style of painting icons. It is closer to realism, but still has many limitations.
Worthy to eat
Korsun Icon of the Mother of God.
Light up the “Leaping” icon
EMBROIDERY COSTUME FOR AN ICON. (My humble experience)
- I make tracings (tracing paper) from the icon myself, or the icon painter gives it to me. Naturally, without drawing the details of the baby’s face, arms, legs, only the contours. The contours of the details that will subsequently be cut out need to be drawn a little further away so that later the chasuble does not run over the icon and partially cover the face or hands, and if there is a slight shift, which, in principle, should not happen, but suddenly!, then It would be possible to edit the work. If the hole is slightly larger, it’s not scary, but when the chasuble overlaps those parts of the icon that should be open, then this is bad.
- I make color sketches (I started doing them recently, on the advice of teachers from Ubrus, and they are very helpful in my work). I decide in general terms on the material that I will use in my work. I lay out hundreds of bags of beads, stones, thread, rhinestones, decide what might be useful in my work and put them in a separate box. I remove the rest so it doesn’t confuse me. As for the colors used in the chasuble, of course, pearls and beads of pearl colors, from white to light beige (see photo 1) are very suitable. I embroidered chasubles and tried to exactly repeat the colors on the icon (see photos 2, 3), but it seems to me less successful. In addition, the color range of beads is still limited; it is not always possible to find what you need to satisfy both in size, quality, and color. It is best to use Czech beads, of course. And the smaller the better. I practically don’t use glass beads, they are rough, but I introduce a little cutting into embroidery.
- Hooping the fabric. This process is already known to us, I hoop it the way it was taught in Ubrus. Only I don’t have a web, so I work without it. If the surface is completely embroidered, then you can embroider on cotton fabric; if it is assumed that part of the fabric will be visible, then we take the top fabric as we need. There can be several fabrics, i.e. there is one background fabric, and another halo fabric is superimposed on it (sewn with small stitches) (see photo 4). Sometimes the surface looks more interesting if gold brocade is used as the top fabric; it gives an additional soft glow to the beads, and it looks beautiful if the chasuble is not sewn together, but with gaps in some places (see photo 5)
Icon painting training
Icon painting is a type of painting that has its own aesthetics, techniques, and technology. In this article I focus on the aesthetic-craft principle in icon painting. To create a perfect image, if possible, you need to master the perfect form. In addition to mastering craft skills, it is necessary to cultivate artistic taste, to more often contemplate the masterpieces of Russian and world icon painting located in museums, which, unfortunately, is not available to everyone. Often reproductions of icons suffer from color distortion; the icons themselves are in poor condition. For training, of course, you need good albums, reproductions, or better yet, photographs of fragments taken in museums, which are available to serious icon painting schools.
After the basic exercises described in the previous article - slides, architecture, water, trees, you can begin to paint the ancient robes of saints and study the system of spaces on the folds. Basic techniques for creating an icon-painting optical system: revealing, shading, highlighting, inventory, glazing. Often, instead of constant exercises, students want to learn some “secrets” or “special technologies” that do not exist. It's better to do a simple task well, such as painting a sleeve or other piece of clothing multiple times to make it look convincing. Exercises can be done on stained stretched paper or hardboard; you need to learn how to clean off bad moments with a scalpel. The reveal, that is, the spot of color on the clothes, is denser than the slides, but with a certain amount of transparency. The spaces have a stepped character, reaching up to five steps in some ancient Russian icons. They must be clearly separated from each other and have their own logic for constructing the volume. The spaces do not begin with pure white; the color of the overlay or another pigment may be mixed into them. Cold blue spaces are often made on the lilac color; this color is produced by a mixture of white and black. The gaps in the last phases reach full density, in the middle ones they are more transparent, the color of the clothes can shine through them. On the shadow side, the volume is modeled by “shading” - thin, transparent, glaze layers of paint, a color slightly darker than the overlay. The construction of the form is completed with inventories and thin whitening strokes. Inventories create shadow “depth”, they have different intensities, and are darker on the shadow side. In search of expressiveness, it is necessary to learn how to calmly “crumple” the material, change proportions, colors, move some details, clean off something partially or completely. Corrections to the drawing are visible on ancient icons; the old masters did not use any “graphics”. Scratching the outline is done during gilding, so as not to lose the silhouette when overlapping the gold. The technique of constructing volume in an icon is multi-layered; the layers are dried; work is not carried out “from the raw”.
What role does ornament play in church art?
Dmitry Trofimov, head of creative workshops “Tsargrad”
Ornament is the signature of the era; it expresses the artistic style of the time most concisely and clearly. At first glance, the ornament plays a subordinate role in a work of art. However, just as in the fabric of a musical symphonic work the sound of each instrument is significant, no matter how small its part, so the artistic imagery of ornamental forms acquires its meaning when examined in a single compositional organism of a book sheet, an embroidered shroud, or a temple painting. Ornamental creativity manifested itself most clearly in the temple decoration of the 6th century, the so-called Justinian era. At this time, the ornament was almost equivalent to the plot images. The temples of Ravenna, which have preserved their mosaic decoration, especially clearly demonstrate that the ornament here is not just an unobtrusive accompaniment. He actively shapes the environment, space.
The arrangement of the subject mosaics in these temples is extremely structural, logical, and strictly consistent with the architectural rhythms. They are few in number, but each carries an image imbued with theological symbolism, multi-layered meanings, and is located on the main arches and walls, where they are not only clearly legible, but mark the most significant sacred areas.
Icon painting can be mastered from books, or learned in a monastery, art school, church, etc.
There are several ways to learn how to write icons correctly.
To get an education. The most reliable way to master this art is to undergo training at the department of icon painting, where everything will be told and shown according to a special program.
Learn from a master. There are many masters who are quite capable of taking on a conscientious student. Some work in schools, churches, etc. Someone paints icons for themselves. But finding such a master is always possible.
And then - as agreed. The teacher is always able to point out mistakes. But two problems are possible: the master may forget to tell something, and it is also not a fact that this person is really as competent as he seems.
Master special materials yourself. There are many distance learning offers on the Internet. There are videos for those interested. There is a whole carload of books on icon painting in Orthodoxy.
But there are pitfalls here: you never know how good your teachers are and there is always a risk that the book will not contain some important information. In addition, textbooks often duplicate each other. Studying the fourth tutorial in a row will be tiring.
An excellent help for a beginner is a series of lessons from Oleg Toropygin’s studio. Below is a video of the first episode:
For variety, you can also study an example of step-by-step writing of the icon of Jesus Christ on the ALF OMEGOV channel:
And you will have to master a lot: styles, canons, techniques, tools, materials, etc. But still, such icon painting lessons for beginners are the best option. It’s easier to try your hand at home right away. If it doesn’t work out, it won’t be as offensive as if you were disappointed already at university.
Methods of applying a design to gesso
Before starting to apply the paint layer, it was necessary to transfer the drawing onto the base. This is a very important moment of work. In the old icon-painting workshops, drawing was entrusted to the most experienced craftsmen - “flag-bearers”, who “signed” the drawing, that is, transferred it to gesso.
The methods of applying a design to gesso are very diverse. Previously, flag bearers could first make a light charcoal sketch on the ground, then draw it in detail with black paint. Many old icon painters, holding the original before their eyes, could apply the drawing to the board directly with a brush. This gave them the opportunity to creatively rework the canon accepted in icon painting.
Students or less experienced masters used so-called “translations” or “translations”.
Proris is a schematic linear outline that carries the general structure of the image, as well as relatively developed details: faces, folds, clothes, chambers, landscapes, and so on.
In order to transfer a drawing from a trace, its reverse side was rubbed with coal or graphite and pressed with a blunt needle. At
This, naturally, left graphite or coal lines on the ground. They were enhanced with a brush in a tone of ocher or black paint. Sometimes the lines left after the translation were scratched with a sharp needle. Such lines are usually called “graphics”. The good thing about scratching with a needle is that the indentations remain visible even after applying a layer of paint. This helps the artist use them as auxiliary lines when finally drawing heads, hands, clothes and other elements of the composition.
Sometimes the drawing was transferred from tracery to gesso using the gunpowder method. To do this, along the main formative lines of the drawing on the paper, a series of nearby points—holes—were pierced with a sharp needle. Then, with a gauze swab, into which finely ground charcoal was poured, they passed (or lightly hit) the punctured holes of the design lying on the ground, thereby transferring the design to the surface of the gesso. This was followed by drawing the lines with paint or pencil. Excess coal was brushed off with a goose feather.
To prepare the necessary paint, you need to take the dry pigment of burnt bone or soot and thoroughly grind it with garlic juice or honey in a wooden spoon. Then wipe the colorful surface of the icon with the yolk of a chicken egg mixed with kvass. After the yolk has dried, use the prepared paint to draw the lines of the drawing, while maintaining all the line thicknesses of the original. When the drawing dries, a sheet of clean paper is placed on it. In order for the drawing to be clearly printed on paper, it is “blown”, that is, warmed by breathing. This gives it the ability to be “unstick.” In this case, the drawing should be clearly imprinted on the paper. In essence, this is proris (translation), but in reverse. Previously, this method was called “unstick transfer.” Do not forget that after removing the traces, the icon must be wiped 2-3 times with damp cotton wool or a sponge. In order to get a straight line from the reverse drawing, it is transferred to tracing paper.
You can immediately remove a drawing from an icon onto tracing paper, but to do this you need to increase the transparency of the tracing paper. This is done by rubbing it on both sides with oil or drying oil, followed by thorough drying. On oil tracing paper, the pencil fits well, and the paint can “run.” To prevent this from happening, the surface of the tracing paper must be wiped with a cut clove of garlic or lightly rubbed with a rubber band.
You can transfer the drawing onto the board from tracing paper either “tack-on” or using carbon paper, pressing it with a hard pencil. To transfer the drawing “tack-free”, you need to draw the back side of the tracing paper with paint diluted with garlic juice or honey. In the first case, the writing on tracing paper or paper is carefully placed on the board, blown under the tracing paper and carefully pressed against its surface. In the second case, the drawing translated through carbon copy is drawn first with a pencil, then with paint or ink. It must be borne in mind that dirt and blackness are removed using dry pumice with your finger, since an eraser smears the lines and spoils the gesso.
It is more convenient to draw a drawing on gesso not with paint, but with ink. If any incorrectly placed paint layer needs to be removed, the ink drawing will be preserved, but the paint drawing will not.
Fragment of the Assumption icon. Linden, pavoloka, gesso, tempera. Second half of the 15th century. Tretyakov Gallery.
What is an icon
An icon is a graphic image that embodies the face of a celestial being or a sacred event. But not all paintings painted on sacred subjects are considered icons. All sacred graphic works are divided into the following groups:
- paintings on religious themes;
- folk icons;
- church icons.
The Official Church considers an icon to be an image painted in accordance with canonical and iconographic rules. It should also be remembered that an icon is not an idol or a talisman, but a part of the Divine Liturgy, which is a conductor of the prayerful appeal and faith of an Orthodox Christian.
Story
The first icons appeared back in the time of the apostles. The ancestor of icon painting is called the Evangelist Luke. It has received the greatest development in countries professing Orthodoxy. The main centers of icon painting include the following countries:
- Byzantine Empire;
- Kievan Rus and Muscovy;
- Bulgarian kingdom.
In the history of icon painting, there are several main stages, which are characterized by unique distinctive features in the manner of execution, composition and drawing of images.
Who can paint holy images
During the heyday of church religious painting, the requirements for icon painters were clearly formed. They were voiced at the Local Council of the Orthodox Church in 1551.
- A true icon painter has a meek, humble and reverent disposition.
- He should not use foul language or indulge in idle reasoning.
- The soul, thoughts and body of the person painting holy images must be pure.
- While working, you must observe fasting and abstinence, accompanying all your actions with prayer.
- The artist must closely follow the models of the ancient masters, without succumbing to the temptation of pride to surpass them.
Thus, an icon painter in the Middle Ages had to have a high level of personal and spiritual qualities, lead a righteous and ascetic lifestyle in order to convey the holiness of the sacred image. Most often, monks became icon painters.
In the conditions of a reviving spiritual culture, formed under the influence of modern realities, ancient requirements for icon painters are not always met. Most often, in special departments of art universities, ordinary lay people, exposed to the vanity and temptations of the modern world, gain knowledge and skills in icon painting.
You should know that the main requirement for a modern icon painter is a high level of spiritual culture and actual participation in church life. Any person who decides to create an icon must receive the blessing of a confessor, accompanied by a special prayer.
Read about revered icons:
How to paint an icon
Creating a holy image is hard and painstaking work, requiring a lot of spiritual and physical strength from the master. The traditions of creating icons have remained unchanged for many centuries. The whole process consists of several stages.
Wood blank
Traditional Orthodox icon is written on a board. The type of wood used depends on the area in which the craftsman works. The most commonly used trees are:
An important role in the longevity of an icon painting is played by wood processing, which had the following requirements:
- It must be completely dried and seasoned.
- The board is made from a strong central part of the trunk.
- The components of large icons are held together with natural wood glue and additionally secured with dowels.
As a rule, a small recess is made on the front side of the icon, limited by narrow margins. For the convenience of further preparation, the working part is made into relief using a serrated plane or a breadboard knife.
Preparing the base
The wooden blank is covered with a special base primer called gesso. It is made from gelatin (fish glue) and chalk. The heated mixture is applied to a wooden blank and covered with pavolovo - a thin cotton cloth. After the pavolok has dried, another 10-14 layers of gesso are applied to the workpiece, each of them thoroughly drying for 24 hours.
The prepared base is sanded, giving it maximum smoothness.
Read about icons of saints:
Creating an image
In the old days, several masters worked to create one icon, each of whom performed a specific process:
- The sign-maker created the outline of the image, applying the canonical examples of the chosen image to the base of the copybook. The initial work was carried out with birch charcoal, and then the outline was additionally drawn with black paint. Sometimes the outline is scratched so that the image can be seen even under a layer of thick paints.
- After working out the outline, the gilders began work, applying a thin layer of gold leaf to all the necessary details of the image.
Today, as a rule, all these processes are carried out by one master.
How to draw an icon | Watch a free online lesson, training video
Art is an integral sphere of human activity. The formation of the entire society as a whole and each individual in particular depends on the level of its development. As you know, the purpose of art is aesthetic knowledge of the external world. To achieve this, art takes different forms, using different manners and styles. This is necessary in order to fully convey on canvas or paper the thoughts, emotions and feelings of people. For this purpose, art cannot do without creating an artistic image.
All types of fine art have their own characteristics and unique sides. One of them is icon painting.
Learn how to draw an icon in the informational video below.
Video training “How to draw an icon”
Icon painting technique
Experts say that not everyone can thoroughly master the technique of icon painting. This is its originality and uniqueness. The sequence of icon creation dates back to ancient times. Thus, the icon painter draws inspiration and at the same time the very principle of drawing from previous generations of sacred works of masters. First of all, novice icon painters strictly observe the traditions of their ancestors. It is worth noting that at some point you can deviate from a number of methods, but you must not forget that the image of the icon and the sequence of its construction should reflect the ancient traditions of icon painting.
Each icon, experts emphasize, cannot do without four parts - layers.
The base is a piece of canvas or a shield made from a wooden board. Soil or gesso will make up the second layer. The painting itself begins when the penultimate layer is created.
It is important to note that colorful materials for drawing an image can be prepared from both natural and artificial egg emulsions.
The final layer not only puts an end to the image, but, above all, protects the icon from external influences. At the end, the image of the icon is covered with a thin film of hardened vegetable oil. Accordingly, work on the icon is divided into four long stages.
Traditions of outstanding icon painters
Modern icon painters make icons from a variety of materials. But under no circumstances should you deviate from historical technology. This violates all existing canons.
To draw an icon you will need:
- board;
- priming;
- tempera paints;
- hide glue;
- brushes of different thicknesses;
- gauze;
- sandpaper.
It is important that the board is smooth and well dried. It is best to use a linden board for work. As a last resort, you can use coniferous, spruce or cypress trees. If desired, a board of the required size can be assembled from small fragments. This activity should be approached with all responsibility so that the pieces of material are not too different from each other. Otherwise, bulges will appear on the icon.
The recess should be in the very center of the icon. At this place, as a rule, the face of saints is depicted. In order to avoid the appearance of depressions and protrusions, it is advisable to thoroughly rub the image with sandpaper.
Creating an icon requires considerable knowledge in the field of fine art, as well as relevant artistic skills. Before you engage in icon painting, you need to properly study the available techniques of this type of art. In addition, it would not hurt to learn all the nuances about the materials from which the icon is composed.
obvi.ru